I've been offline for a while dealing with some 'life' stuff - I don't wish to burden you with the details, but it's caused me to remember how I got to the point I'm at today where I'm pretty much on top of my home paperwork. So now I'm back, here's a marathon post for you! This is inspired by several productivity blogs I've been reading, including
www.lifehack.org, and a recent experience involving a mountain of paper dating back to the 1970s.
Most people I know fall into two categories with domestic paperwork:
- They have tons of stuff dating back to who-knows-when, piled up or hidden away in various places around the house, and want to get organised but it's just too much of a mammoth task to file everything
- They don't have tons of paperwork but still can't find anything in a hurry
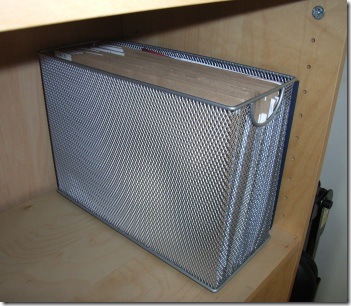
This post is aimed at the people who fit case 1, although some of it is probably useful if you're case 2. Until a couple of years ago I was a bad case of case 1. I had probably 10-15 years worth of paper, some of it was in boxes, some in carrier bags, some was meticulously filed (where I'd had brief bouts of trying to 'get organised' over the years). I couldn't find things when I needed them, and worse, I knew I didn't need half this stuff but it was too big a task to file everything from such a huge backlog, and I figured it wasn't worth going through it at all if I wasn't going to apply my 'system'. I also thought my day-to-day filing system would be at least a couple of drawers of a filing cabinet. See the photo below if you want to know what it really looks like!
The first thing that changed my mindset was reading
Getting Things Done by David Allen
. It was recommended to me by a work colleague, but really I should say evangelised, because if you know anyone who's read this book and applied what they learnt you'll probably find they talk like someone who's undergone a religious conversion. It really does change lives, not just at work but at home too. I don't even use everything from the book, and it's made a huge difference to me.
Anyway, I last read GTD (as it's known) a long time ago and I can't remember which of these things I've lifted straight from the GTD method and which were home-baked, but this was what worked for me. You could probably put this into practice today without reading the book, but I'd encourage you to read it anyway because it covers much more than just getting your paperwork in order.
Step 1 - before Day 0
Prepare. This needs to happen before Day Zero, the day you set aside to get your paperwork in order. Like they told you about taking exams in school, read everything before you do anything. Figure out which things here you can do on Day Zero and which require some thought beforehand.
One thing you definitely need to do as part of your planning is decide on a cut-off date before which none of your paperwork could possibly be useful. For me it was 7 years because I heard somewhere there's some kind of time limit on historical queries for taxation purposes, and I used to run my own business so I'm a bit paranoid about these things. Maybe I could have gone for less, but better to be safe than sorry. Whatever date you choose, make your cutoff date the beginning of that year. Whole years are much easier to work with.
You'll also need to consider things like how much shredding and recycling you'll generate as part of the process, but more on that later.
Step 2 - Day 0 or before
You need to go shopping for some supplies. If you're doing this on Day 0 then get up early - you've got a lot to get through today! I'm not an 'early' person so I went to Staples (open until 8pm!) the night before and missed the traffic.
There are a few supplies David Allen strongly recommends for GTD, and I have a bit of a thing about nice stationery, so the opportunity to buy office supplies, strangely, was an incentive for me to get started. If shopping for stationery doesn't float your boat then just grit your teeth and get through it, and promise yourself a nice piece of cake/cold beer/whatever as a reward when you're done.
Here's what I bought:
- A dymo (or similar) labelling machine. This is recommended in GTD, and I'm glad I went along with the advice. I think mine cost about £20 and came with enough tape to see me through the first year of filing. Your mileage may vary, but my point is that you don't have to spend much on this.
- Some cardboard square-cut file folders (also a GTD recommendation), like you can just see in my filing box in the photo above. I bought a pack of about 100 dirt-cheap ones when I started and I haven't used half of them yet. I couldn't find these on the high-street, so if you don't have an office supplies superstore within striking distance, you might want to shop online a few days ahead. I prefer them to suspension files because they're far less fiddly, but if you just love suspension files then go ahead and buy those.
- A filing box (the last thing from the GTD list) which is just a box with an open top that the file folders fit in for easy access for your day-to-day stuff. Mine is in the photo attached to this post, and it's plenty for one person's worth of 'current' paperwork. Really, it is. You'll be surprised how little space you need. Get something that looks nice enough that you'll want to keep it out on your desk, or your kitchen counter, or in my case the storage unit in the living room. The idea is that this should go wherever you usually sort through your post. It seems crazy, but just having a lid to open is an extra step that makes you put that piece of paper in your hand somewhere other than the folder it should go in, so try to get one without. (You might think only the laziest, least self-disciplined person could fall into that trap, but I know I fell into the trap of not dealing with my post many hundreds of times to end up with a house full of paper in the first place.)
- Box files - how many depends on how many years you decided to archive in Step 1. Here's how I worked out what I needed:
- This year (Year 0) and last year (Year -1)- I consider 'current' so it goes in the filing box that stays in my living room, so no box file required
- Year-2 gets its own box file
- Year -3 gets its own box file
- Y-4 to Y-7 I decided should all go in one box, but I bought a spare just in case one wasn't enough.
- In my case I also had some stuff from my old business which I wanted to keep separate, so I bought a couple more box files
I should say at this point that if you run a business (mine was already shut down when I started this) then you'll probably need two 'current' filing boxes for your day-to-day stuff to keep everything nicely separated. Similarly, if you're doing this for a couple or a family, you could each have your own filing box and one for things relating to all of you, although it would probably be more practical to just colour code your cardboard file folders so everyone can easily file and find their own stuff.
You might be wondering why you couldn't just buy one of those concertina files made for home use, or one of those file boxes with suspension files in. David Allen recommends square-cut files just because they're quick and easy and it's no hassle to grab a new one when you need to create a new category in your filing. This is another place I'm glad I followed his advice because they're not what I would have chosen but they work perfectly. But if concertina files or suspension files are your thing then go with those. (Just remember to get a concertina file with enough pockets - see step 4.4 and add some extra for the things you'll discover along the way.)
Step 3
Gather everything together! If you're as bad as I was, you might want to commandeer a room for this task, move all the furniture back, and just chuck everything on the floor in the middle of the room. There are two good reasons to do this: 1. you don't waste time trying to sort things during the 'gathering' phase. 2. If you deliberately pick a room you use every day (so not the spare room) then you'll have to deal with everything to get the room back!
Look in all the places you've hidden paperwork, dig out every last thing you can. If there are piles of paper in the loft or garage you feel like you need to deal with then get those too (although there's a good argument that if it's been there for more than a couple of years, you really
don't need it and it should probably go straight in the recycling bin).
Step 4
This is the daunting bit, because now you've got this massive mountain of paper in front of you, and you need to clear it today. But chances are the mountain isn't as bad as you thought, and anyway you don't have to do meticulous filing to get to the next phase. You will need some space to put things as you sort through (empty floor space is fine) and some kind of receptacle for recycling. (If your heap includes magazines and other junk mail still in polythene bags like mine did you may need a bin for non-recyclable rubbish as well.)
However... when I did this, I knew at the start I'd have more shredding than my poor little domestic shredder could handle. I ended up getting a quote for a secure document disposal company to take everything away and shred it at their plant. This had the advantage of not requiring me to separate anything - their minimum charge covered way more paper than I was going to generate even including non-confidential stuff, and the nice people I used had a machine smart enough to separate out things like paperclips, notebook bindings, and even plastic file pockets, so less work for me. It wasn't cheap, but in my case it was well worth it. But organising a company to collect your paper is something you should do when you're preparing, not while you have all your stuff piled up on the living room floor!
Step 4.1
Just getting started is such a huge step, I've put it on its own. Well done for getting this far without chickening out.
Grab that first pile of paper. Start with whatever is nearest and take as much as you can hold in your hands to work with and no more.
Step 4.2
Look at your first document or piece of paper. Apply the following decision tree:
- Is this of any use or might it be needed e.g. for tax purposes? If it is, go to 3.
- If not, does it have any sentimental value that makes it worth keeping? If yes, put it aside in the 'sentimental' pile. If you're not sure, add it to the pile anyway.
- Is it dated more recently than your cutoff period, or if not, is it something you need to keep longer e.g. a birth certificate, a manual for a cooker you still use, or the six-year corrosion warranty for your car? If it is, go to 5.
- If not, put it with the recycling.
- For everything else you keep, it needs to go into one of three piles:
- Current (anything dated this year or last year - we only work in whole years here!)
- Long-term items - anything which has a 'current' life of more than a year, e.g. the 3-year warranty for your car - also go in the Current pile
- Archive - anything between your cutoff date and 31 December Y-2 (the year before last)
- Reference - e.g. manuals for appliances, birth certificates
Step 4.3
Grab another handful of stuff and repeat step 4.2. Keep doing that until the paper mountain you started with is gone, and you have three small paper islands and (probably) a huge pile of paper for recycling.
Step 4.4
Pat yourself on the back, you've done the worst bit. And look how much you can throw away and never worry about again!
You're now going to create your day-to-day filing system, or your 'current' box. So get your filing box, a handful of file folders and your labelling machine. First, make up some folders which you already know you're going to need. Mine were:
- Bank statements
- Bank - Other
- Utilities (water, gas and electric bills go here)
- Phone (for phone bills and other worthwhile correspondence from the phone company)
- Mobile (mobile phone bills and correspondence)
- Cable TV (you get the idea...)
- Health (anything to do with doctor, dentist, gym membership, etc.)
- Home (home insurance goes here, bills from household repairs, that kind of thing)
- Work (payslips, letters from my employer)
- Shopping (warranties, receipts, returns slips for mail-order items I might want to send back)
- Travel (travel insurance documents, correspondence about my season ticket)
- A-D
- E-K
- L-R
- S-Z - these last four are my 'catch-all' folders for anything which doesn't generate enough paper to have its own file. I used these groupings because they're how the London phone books used to be organised when I was a kid, but go with whatever works for you. Unless you get a really insanely huge volume of mail you want to file, having one for each letter of the alphabet is usually excessive.
The important thing at this stage is not to think too hard about creating a folder for everything you could possibly need. Just do the obvious ones for now, and keep the labeller and blank folders handy to create new ones as you need them.
Now go through your 'current' pile and file everything in your folders!
You'll probably find one particular category has a lot of paper associated with it and starts to take over the filing box, like if you have a hobby that generates a lot of correspondence, or if you have a domestic project going on like building a new extension. In this case it makes sense to create extra storage of whatever kind you need, but it's best if you can keep it with the filing box (i.e wherever you go through your post each day) and make it no more difficult to access than dropping a piece of paper in the cardboard files. Just as an example, I keep everything related to my car in its own plastic A4 box (which is a bit fiddly, but I don't have to add to it often), and when I changed jobs I had a document wallet for all the paperwork that generated.
Remember: rules are for fools to obey, but for the guidance of the wise. If something in this approach isn't practical for you, just think of how you can bend the rules without compromising on your main goal: creating a system that's easy to maintain.
Step 4.5
This bit is dead easy.
Grab some box files and label them up with the appropriate years for archiving. If I were doing my system starting today, I'd have 2006, 2005, 2004, 2003-and-before, so four boxes. Now you just have to split out the Archive pile into each of those years. The big revelation for a lot of people comes at this part...
you don't need to categorise or sort any of this stuff beyond grouping it by year. Categorising is for stuff you might realistically need to get your hands on quickly. For how often I need to refer back to something that happened three years ago, I realised it isn't a huge burden to go through that small pile of paper. And I was surprised by how little paper there was for each year. This is the difference between getting from "oh my god how am I ever going to file this mountain of paper?" to a workable system.
When you're done, find a place to store your archive files. You want somewhere you can get to them when you need to, but they don't have to be right at your fingertips. So if you have a bookcase in a study, or a high-up shelf somewhere, that would be ideal.
Step 4.6
This bit will take all of two minutes. Divide up your reference pile however you want. I've split my manuals into 'kitchen' (so cooking and washing appliances) and 'lounge' (everything else) and keep each box in the appropriate room. You figure out what works for you. You probably don't need to access this stuff often, the most important consideration is that it's somewhere convenient enough that when you buy a new appliance or whatever, you'll file the manual in the right place and not let it drift out of your filing system and end up falling down the back of the refrigerator weeks later. You might have a 'family' box for birth certificates, passports, other important documents that you need access to from time to time. Decide on your own storage place for these, just make sure you keep it separate from other stuff and in a place where you can find it.
Step 4.7
Remember those 'sentimental' things you put to one side?
Now go back through those and decide what to keep and what to lose. It should be much easier to do that now, with the whole lot in front of you. Maybe you don't need to keep
every school report you ever had, perhaps there are just one or two worth keeping. If you're into scrapbooking, maybe some of this pile will find its way to wherever you store your craft things. If you're like me they'll just end up in a keepsake box that you dig out very occasionally. Like everything, how easy this stuff is to get at should correlate to how often you'll want to add to it or look at it.
Step 4.8
Well done! You should now have an organised, easy-to-maintain system for day-to-day paperwork, an archive for anything you need less often, and a big pile of rubbish to take to the recycling plant. If you have any energy left you could do a small lap of honour before you put the furniture back.
If the stationery shopping way back at the beginning
wasn't enough reward for you, it's time to have that piece of cake or cold beer you promised yourself.
Step 5
This is the part where you commit to maintaining your system for the rest of your life. Actually I'm kidding. The fact you just spent a day working your backside off getting things straight, and basking in the smug glow of being organised should be enough for now. My next post will tell you how you can keep this up forever in just one minute a day, plus an hour a year for housekeeping. That's not about commitment, it's just about forming new habits.